Thursday, December 27, 2012

Crochet android toy


Size:
  • Approximately 7" (18 cm) tall
Materials:
  • Worsted weight yarn in Green and White.
  • Suggested Hook Size: F (3.75 mm)
  • 12 mm two-piece black eyes or eyes of your choice.
  • Fiberfill stuffing
Optional:
  • Extra pair of two-piece eyes (9 mm) for arm joints.
  • Weighted stuffing for legs.
  • Plastic Canvas for base of legs.
Notes:
  • Android worked in continuous spirals.
  • Use a stitch marker to mark the beginning of each row. Move stitch marker up each time you start a new row.
Color Code:
  • MC: Main Color (Green)
  • CC: Contrast Color (White)

Body

With MC make a magic ring.

R1: 6 sc in magic ring. (6 st)
R2: 2 sc in each stitch around. (12 st)
R3: (2 sc in next stitch, sc in next) 6 times (18 st)
R4: (2 sc in next stitch, sc in next 2 st) 6 times (24 st)
R5: (2 sc in next stitch, sc in next 3 st) 6 times (30 st)
R6: (2 sc in next stitch, sc in next 4 st) 6 times (36 st)
R7: (2 sc in next stitch, sc in next 5 st) 6 times (42 st)
R8: (2 sc in next stitch, sc in next 6 st) 6 times (48 st)
R9-13: 1 sc in each stitch around (48 st)
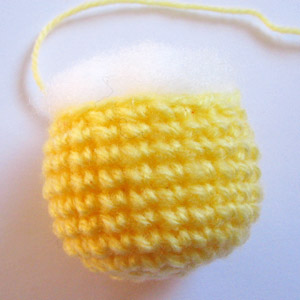
R14-15: Change to CC 1 sc in each stitch around (48 st)

If you’re using two-piece animal eyes, you should insert them now. I put mine between rounds 8 and 9 about 9 stitches apart. The eyes should be on the opposite side of the head from where you begin each round.

R16-31: Change back to MC 1 sc in each stitch around (48 st)

If you’re going to make the arm joints using two-piece animal eyes, you should make the arms now and then attach them to the body with the eyes before you start stuffing your Android. If you’re going to thread-joint the Android’s arms then you should stuff the Android almost full now and then continue closing him up.

R32: (invisible decrease, 1 sc in next 6 st) 6 times (42 st)
R33: (invdec, sc in next 5 st) 6 times (36 st)
R34: (invdec, sc in next 4 st) 6 times (30 st)
R35: (invdec, sc in next 3 st) 6 times (24 st)
R36: (invdec, sc in next 2 st) 6 times (18 st)
R37: (invdec, sc in next 1 st) 6 times (12 st)

Finish stuffing the body.

R38: (invdec) 6 times (6 st)

Fasten off. Stitch the hole closed and weave in the end of the yarn.

Antennae (Make 2)

With MC ch 5

R1: sl st in 2nd chain from hook and in each remaining chain. (4 st)

Cut yarn, leaving a long yarn end. Draw end through last loop and pull tight to fasten off.

Sew on to the top of the Android head. The left antenna should line up with the inside corner of the left eye, the right with the inside corner of the right eye.

Arms (Make 2)

With MC make a magic ring.

R1: 6 sc in magic ring. (6 st)
R2: 2 sc in each stitch around. (12 st)
R3-13: 1 sc in each st around (12 st)

If you are making the Android with two-piece animal eyes then now is the time to put the front of the eye in the arm and attach it to the body. (Which you left open at R31)

After you attach the arm to the body, stuff the arm.

If you aren’t using the two-piece animal eyes for joints, then disregard the eye-joint instructions and just stuff the arm. (The arm should be about 6.5 cm long.)

R14: (invdec) 6 times (6 st)

Fasten off. Stitch the hole closed and weave in the end of the yarn.

Once you’ve made both arms, you can attach them to the body by thread-jointing them on. I put my Android’s arms a little too high. They should be attached below the white line around the Android’s neck.

Legs (Make 2)

Option 1

The first option for the legs is to make your Android stand. To make these you need the weighted stuffing and the plastic canvas. You might also need the toe-ends of a pair of stockings if you want to make sure the plastic pellets don’t fall through the holes between the stitches in the legs.

With MC make a magic ring.

R1: 6 sc in magic ring. (6 st)
R2: 2 sc in each stitch around. (12 st)
R3: (2 sc in next stitch, sc in next) 6 times (18 st)
R4-10: 1 sc in each stitch around (18 st)

Fasten off, leaving a long yarn end. Cut a piece of plastic canvas to make a flat base for the Android’s foot. Put the canvas in the bottom of the foot. Stuff the leg with weighted stuffing. If you don’t put the pellets in the toes of the tights or in sewing bags, then put a little fiberfill stuffing in over the top of the pellets to keep the pellets from escaping while you sew the leg to the Android body.

When you’ve made both legs, sew the legs to the body. They should be in the middle of the base of the body about 2 cm apart.

Legs (Make 2)

Option 2

If you don’t want your Android to be able to stand on his own, then you can make the legs look more like the real Android legs. For these legs you just need ordinary fiberfill stuffing instead of the weighted stuffing. (The legs should end up being about 3 cm tall.)

With MC make a magic ring.

R1: 6 sc in magic ring. (6 st)
R2: 2 sc in each stitch around. (12 st)
R3-7: 1 sc in each st around (12 st)

Fasten off, leaving a long yarn end. Stuff the legs and sew them on. They should be in the middle of the base of the body about 1 cm apart.

Monday, December 24, 2012

Baby Chicky Amigurumi


Head:
make 1 piece with your choice of yarn color. Work from top to bottom.
Rnd1: Make magic ring and 6sc in ring (6)
Rnd2: 2sc in each st around (12)
Rnd3: *Sc in next st, 2sc in next st*, repeat * around (18)
Rnd4: *Sc in next 2 st, 2sc in next st*, repeat * around (24)
Rnd5: *Sc in next 3 st, 2sc in next st*, repeat * around (30)
Rnd6: *Sc in next 4 st, 2sc in next st*, repeat * around (36)
Rnd7-14: Sc in each st around (36)
Rnd15: *sc in each of next 4 st, dec 1*, repeat * around (30)
Rnd16: *sc in each of next 3 st, dec 1*, repeat * around (24)
Rnd17: *sc in each of next 2 st, dec 1*, repeat * around (18)
Rnd18: *sc in next st, dec 1*, repeat * around (12), finish off with a long tail for sewing.
Stuff polyester firmly.
 

Body: make 1 piece with your choice of yarn color. Work from bottom to top.
Rnd1: Make magic ring and 6sc in ring (6)
Rnd2: 2sc in each st around (12)
Rnd3: *Sc in next st, 2sc in next st*, repeat * around (18)
Rnd4: *Sc in next 2 st, 2sc in next st*, repeat * around (24)
Rnd5-10: Sc in each st around (24)
Rnd11: *sc in each of next 2 st, dec 1*, repeat * around (18)
Finish off with a long tail for sewing. Stuff polyester firmly.


Wings: make 2 pieces with your choice of yarn color.
Rnd1: Make magic ring and 6sc in ring (6)
Rnd2: 2sc in each st around (12)
Rnd3: *Sc in next st, 2sc in next st*, repeat * around (18)
Rnd4: Sc in each st around (18)
Finish off with a long tail for sewing (as shown in the photos).
http://www.craftpassion.com/wp-content/uploads/2011/06/chick-wing-amigurumi.jpg


Mouth:
make 1 piece with your choice of yarn color.
Rnd1: Make magic ring, 8sc in ring (8) and join with slst.
Finish off with a long tail for sewing.


Legs:
make 2 pieces with your choice of yarn color.
Rnd1: Make magic ring, 10sc in ring (10) and join with slst.
Finish off with a long tail for sewing.


Finishing:
Install plastic eyes, sew mouth to the head.
Sew head to body, then wings and legs.
Glue the ribbon to the neck.

Monday, November 19, 2012

Sweater Baby


Hasil terbaru sweater baby untuk kawan opis, comel pula bila siap combinasi kaler dia.....

Monday, October 29, 2012

Mari Belajar simbul pula

Salam,

Dalam menghasilkan crochet terdapat 2 kaedah iaitu...arahan dan simbol.
selama ni aku lebih kepada arahan dan kurang faham dalam kaedah bacaan simbol.
Jadi aku letak simbol crochet ni sebagai rujukan aku nanti.

simbol crochet

Thursday, October 18, 2012

Bootees Patern


MEASUREMENTS
fits foot (approx) 8(9.5) cms / 3(4) ins

ABBREVIATIONS
St/s - stitch/es
rep -repeat
ch -chain
dc - double crochet (US Single crochet)
slst - slip stitch
tr - treble (US - double crochet)
htr - half treble
sp - space
dec - decrease (insert hook and draw up a loop, insert hook again into next stitch, draw up another loop, 2 loop on hook, draw through both loops.)
inc -  increase ( work 2 dc into one st)

Create bootees

Sole is work in rounds not rows.
Using 3.5mm crochet hook (US E-4)(UK 9) and make 8(12) ch.
1st round - last 2ch count as 1tr, 3tr in 3rd chain chain from hook,*1tr in each following ch for the next 4(8) sts*, 7tr in last ch, rep * to *, 3tr in next ch, join with sl st to 2nd ch of beginning 2ch. 22(30) sts.
2nd round - ch 3(count as 1tr),1tr in same sp, 4tr in next st, * 1tr in each following st for the next 8(12) sts*, 4tr in next st, 3tr in next st, 4tr in the next st, rep * to *, 4tr in the next st, 1tr in same space as beginning 3ch, join with sl st to 3rd ch of beginning 3ch. 38(46) sts.
fasten off if want to change another color.

Note : This is now centre back of sole, mark with stitch maker or exess yarn.

BOOTEE UPPER
Note : 1st round only worked tbl (through back of loop / stitch)
1st round - 1ch(count as 1dc), 1dc in each st for next 14(18) sts, 2dc in next st, 1dc in each st for next 2st, 2dc in next st, 1dc in each st for next 13(17) st, join with sl st to 1st ch of beginning 1ch. 42(50) sts.
2nd round - 1ch (count as 1dc), 1dc in each st, join with sl st to 1st ch of beginning 1 ch.
3rd round - 3ch (counts as 1dc), 1tr in each st for next 16(20) sts, tr2tog 5 times, 1tr in each st for next 15(19) sts. join with sl st to 3rd ch of beginning 3ch. 37(45) sts.
4th round - 1ch (counts as 1dc), 1dc in each st for next 12(16) st, *dc2tog, 1dc, dc2tog*, 1dc in each st for next 3st, rep * to *, 1dc in each st for next 11(41) sts.
5th round - change yarn color, 1dc in each st for next 10(14) sts, 1htr, * tr2tog, 1tr* 3 times, tr2tog,1htr, 1dc in each st for next 9(13) sts, join with sl st to 1st ch of beginning 1ch. end

BOOTEE STRAP - strap is using rows not rounds.
Mark 6(10) sts each side of center back st along top bootee edge.
7ch, sl st into 1st ch to form ring, 8(12) ch,(with toe facing) 1 dc into marked st on left side facing, 1dc in each following st to next marked st, 1dc in market, 15(19) ch, turn, sl st into 7th ch from hook to form ring, 1dc in each ch, 1dc in each st back to first ring. end

Finishing
Using yarn needle sew in all loose ends inside bootee and on bootee straps. Using coordinating yarn sew on buttons below colored edging. Cross strap and mark position first.

Friday, October 12, 2012

GRANNY WHITE HAT

Pattern for GRANNY WHITE HAT (in English)
Yarn: Medium, worsted
Needle: 4mm or 5mm (depending on how tight or loose you crochet. For better results, check the suggested number for the yarn you will use)
Size: 4 yrs to adult
Baby: skip rows 3 and 4 (for the rib part, you must have 36DC)
If you use baby yarn (fine), follow the instructions of a toddler size.
Toddler size: skip row 4, and on the 5th row you must skip a st after the 3DC.  For the rib part, you must have 48DC.


Ch = Chains
Sc = simple crochet
DC = Double crochet
FpSt = Front-post st
BpSt = Back-post st
Slst = slip stitch

Magic ring ( or ring of 4 chains)
1)  12DC on magic ring.
2)  Chain 3 (counts as first DC), and 1 DC on same st.  Then reperat: *2DC on each st * (Total: 24DC)
3)  Chain 3  (counts as first DC).  2 DC on next st.  Then follow this pattern all around: *1DC on the next st, and then 2 DC together on the next st* (Total: 36DC)
4)  Chain 3, and 1 DC in next st.  Then repeat all around: *2 DC + 2 DC on each st below* (Total: 48 DC)
5)  Chain 3  (counts as first DC) , and DC on next 2 st.  Repeat all around: *Chain 1, DC in next 3 st*  (Total: 48 DC and ch)
End with sc on top of the first 3ch (This will leave the st in place to start  the granny pattern on the following row.  I do this instead of the traditional way, which ends with a chain and slip st, and then make slip sts until reaching the next chain-space.)
6-12> Chain 3  + 2 DC (on the space below, between the group of 3 DC´s).  Now repeat the following all around: *Chain 1 + 3 DC on 1ch-space below*, end with sc on top of the first 3 chains.
13> DC in each DC of prior row and 1 DC in each chain 1 space (Total: 64 DC) (Total: 64 DC)
14-16>  For the rib part:  Chain 2 (counts as first BpSt) + * 2 FpSt + 2BpSt* end with sl stitch, and cast off.

Optional: add a flower.

Monday, August 13, 2012

Arnab lagi

Patern nie beli kat etsy...memula memang susah nak faham arahan dia..baca banyak kali juga la. so setelah testing..buka..testing lg...berjaya juga menghasilkan arnab nie...